Animation
Met.3D supports two types of animation:
Time animation animates over a time dimension between a specified start and end time.
Camera animation moves the camera along a path and can be combined with a time animation.
Animation panel
The animation panel controls animations in Met.3D.
Open it from the View menu or by pressing F10 on your keyboard.
This shortcut can be changed in the user configuration.
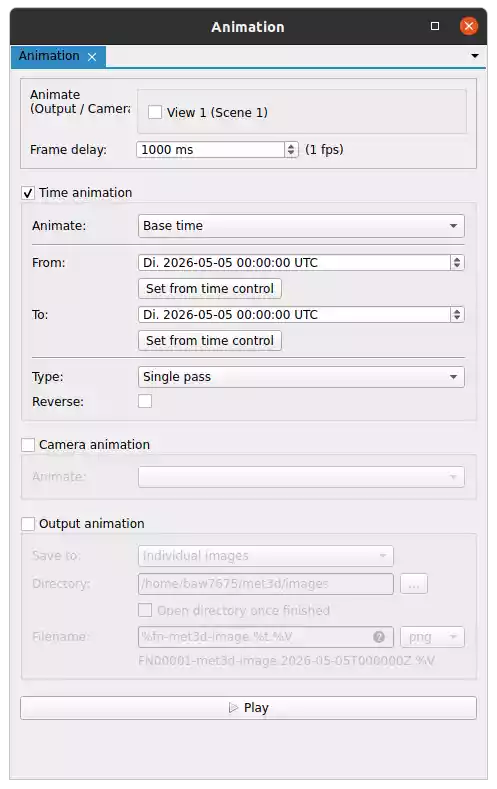
Fig. 8 The animation panel which can be used to setup and start animations.
The first entry in the animation panel lets you select the scene views used for animation and output. For time animations, only the selected views are exported when output is enabled. Other views may still update but are not included in the output.
The Frame delay setting defines how long each frame is displayed, excluding computation time. When exporting a video, this value determines the frame rate.
Enable animation types using their respective checkboxes. For example, time animation can be enabled while camera animation remains disabled.
The Time animation settings allow you to select a Time control, along with a start and end time. Additionally, you can set whether the animation does a single pass over all time steps, loops over them or goes back and forth. The direction can also be reversed, starting at the end time instead of the start time.
The Camera animation settings let you choose a camera sequence to use. See Camera animation on how to create these.
Enable Output animation to export each frame. Supported formats include individual images and MP4 video. You can also output supported actors as geometry files in glTF format.
You can define a file name template for output files. Placeholders can be used and are replaced automatically. The question mark icon can be clicked to view available placeholders. These depend on the output format.
Finally, use the play button to start or stop the animation.
Time animation
Time animations use a Time control to animate the time of the scene. All actors or variables that are synchronized with this time control will update during playback.
Camera animation
A camera animation can be created in the Camera sequencer.
The camera sequencer can be opened by pressing F4 on your keyboard.
It is also docked at the bottom of the window by default.
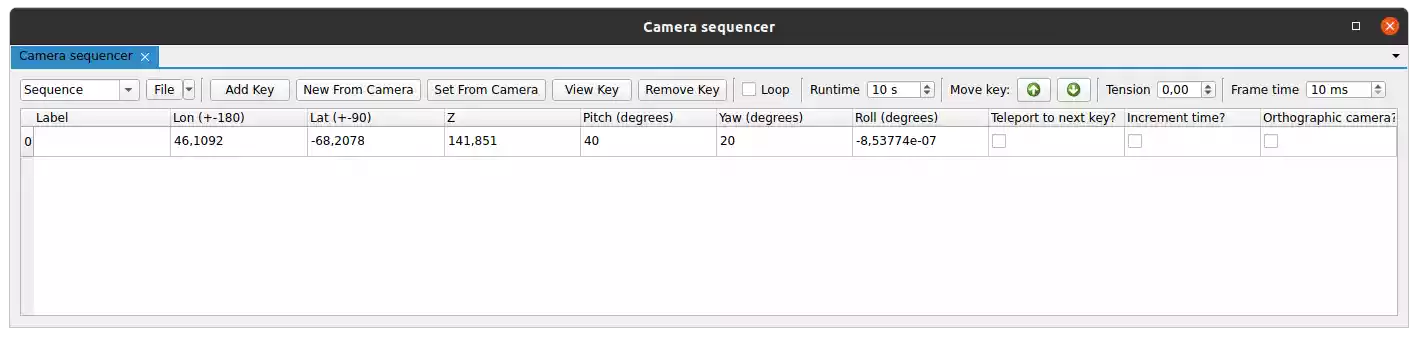
Fig. 9 The camera sequencer used for creating camera animations.
The File menu allows you to create a new sequence, open an existing one, or save the current sequence to a file. The active sequence is shown to the left of the File menu. You can rename it there or select a different sequence to edit.
A camera sequence is composed of animation keys. Each key saves a camera position and rotation. Positions are defined in an abstract coordinate space: longitude and latitude for the horizontal axes, and a graphical Z value that is independent of the scene’s vertical scaling. During playback, the camera position and rotation are interpolated between keys.
To skip interpolation, enable the Teleport to next key option. You can also advance a time animation when passing a key, allowing camera and time animations to be combined.
To create a new key, click Add key or New from Camera at the top. Add key creates an empty key at (0°, 0°, 0), while New from Camera uses the position and rotation of the last active scene camera.
Enable the Loop option to interpolate between the last and first key, restarting the sequence seamlessly. This is particularly useful when combined with a time animation. For example, advancing time on the first or last key and enabling looping allows the full camera sequence to play for each time step.
The Runtime defines the duration of the sequence. With looping enabled, it applies to a single loop iteration.
The Tension allows you to change the smoothness of the positional and rotational interpolation.
A value of 1 is near linear interpolated, while -1 is the smoothest interpolation.